
Wondering what size or how many prints will look right? You are not alone. "What size should I buy?" and "How many will fit?" are two of my most common questions. Here are a few general rules of decorating, along with a few diagrams and labeled examples. Let's take away the mystery and hang pictures with confidence.
Rule #1 Art needs to be AT LEAST half as wide as the furniture below it. It can be the same width or even wider, but let's say between ½ and ¾ the width of your furniture minimum. In the world of art, bigger usually is better, so don't be afraid to fill the entire space.
Rule #2 Art should sit near eye level. Average eye level sits around 57 inches. So we want the center of the frame to sit somewhere near that line. It is better to be a bit below the line than above it. It is natural to lean in to grab a closer look, but less convenient to start climbing on the furniture. Many people hang their art too high. My theory is that they are centering it between the furniture and the ceiling to try to fill the whole space. That leads to an awkward gap between the furniture and artwork, which brings us to our 3rd rule.
Rule #3 Art needs to stay connected with the other elements of the room. Artwork and furniture are supposed to be on the same team. If the artwork is placed too high, it looks like the kid that nobody picked for kickball, with a dividing line of empty wall separating it from its furniture buddies. Most decorators place the bottom edge of the frame 6-10 inches above the furniture. This gives a pleasant margin so nothing looks crammed and also gives a bit of room for life to happen. (Kids can move a bit without hitting the frames.) You may need a bit more space if there are objects crowding the furniture surface. Even then, hanging the art low results in a layered look that is more curated and refined.
So let's look at those rules again.:
- Art should be at least half, or more like 3 /4 of the width of the furniture below it.
- The center of the art should sit near eye level.
- The bottom edge of the art should be 6-8 inches above the furniture.
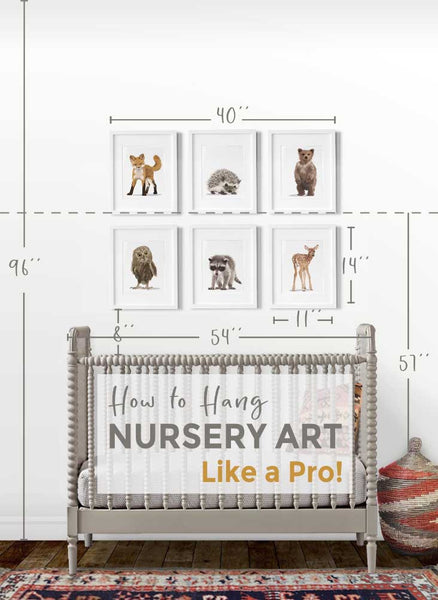
Also, keep in mind when we say art, we are often talking about more than one piece. Art groupings should be considered as a whole. If we are working with several small frames, it may be necessary to add a second or even a third row of frames above so that some part of the art sits at or above eye level.
(Keep in mind there are tons of exceptions to all of these rules. If you are really into decorating then rules are made to be broken.)
So now that we are armed with information, let's go to battle! Let's make pretend we want to fill the area above a crib or dresser. Most cribs are around 54'' wide and about 35'' tall. Dressers are a bit shorter but almost the same width. That means that we are looking to fill a space between 27''- 36'' wide, ideally closer to 36''. We could even go the whole 54''.
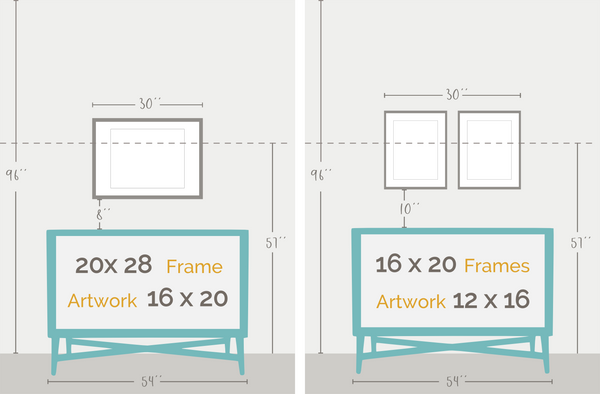
So a 24'' x 36'' inch frame would work great. You could also go with a 20'' x 28'' inch frame. Or two 16 x 20s side by side. Let's see what those look like.

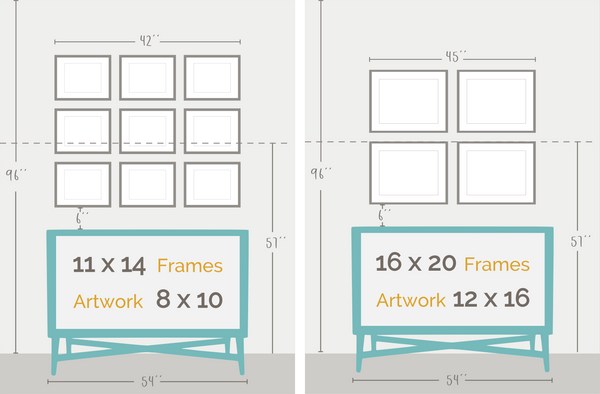
Here are a few examples showing sets of three.
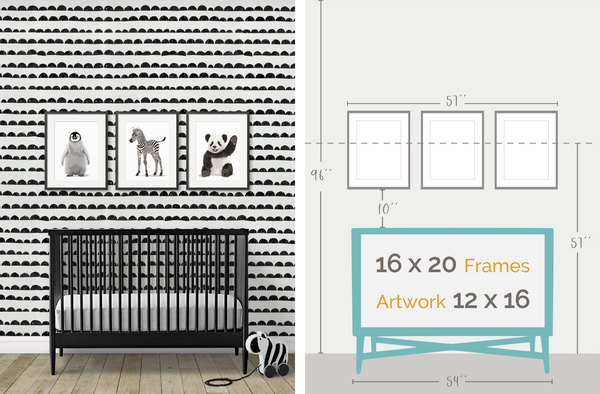
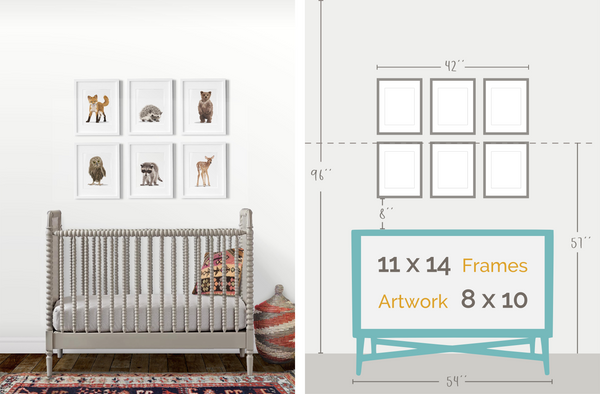
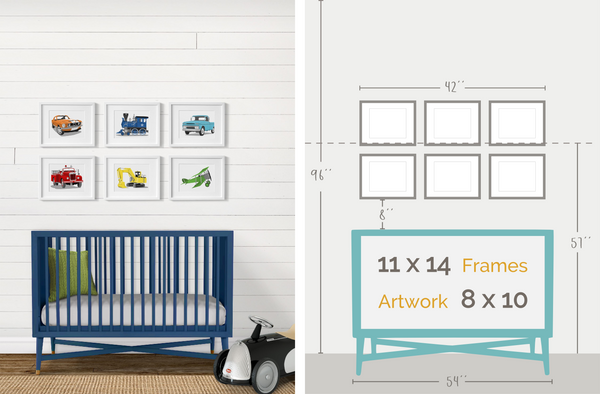
These are all basic examples using easy to find frames. You can go crazy with hoards of other combinations. But, hopefully, this will give you some ideas and a reference point for how standard frames work in relation to a crib or dresser.
Here are two more examples. These are a bit taller and would work great with higher ceilings.
One last thing, consider whether you intend to display the art with a mat or not. Most pro decorators use mats. The extra "white space" adds instant class and can give the art a polished look. But mats do hog up room that could be given to the art itself. If space is limited, forgoing mats can allow for larger prints so the artwork can be seen from across the room. Also, finding mats, especial for large poster size prints can be a bit tricky. It is always a good idea to take a look at ready-made frame options before purchasing your art.
If this article was useful, Please Pin the image below. I would really appreciate it. ;-) If you have any questions or would like to see any other examples feel free to contact me.
Happy Nursery Decorating!